
The Porche Place:: Home School/Homework Room Transformation

Y’all- what in the world has been happening over the last 6 months?! All I know is that we have all felt very out of control in more ways than one. Our school district was all set to go back to school in person/face to face…well I happened to check my emails on the way to our beach trip in mid-July then BAM, all of a sudden the choice was taken away and with almost no explanation at all, we were told that we were now starting fully virtual this fall. Shocked and caught off guard, a few of us neighborhood working moms scrambled and were able to secure an amazing teacher in the neighborhood to oversee our group of 5 second graders. FINALLY, we had somewhat of a PLAN that we felt confident in. Well now we needed a plan to be able to accommodate 5 kiddos and a teacher in our home once a week. Queue all the overwhelming feelings, once again. BUT I knew just the thing to get me excited and motivated…a home design project!! Although we absolutely LOVED our playroom (Porche City Market), the girls quickly outgrew it and it became a room that was no longer used. I always had plans to turn this space into our homework room when my youngest went to grade school, so I decided that now (a year earlier than planned) was as good as time as any given the circumstances!


I have been SO busy with client projects lately that I knew I wouldn’t have any time to design this room for myself. Well I knew that I had 6 hours in the car on the way back from our beach trip, so I turned on my hotspot, pulled out my computer and designed the whole space on the road! I created the room in my layout program so my husband would know the exact measurements of everything I needed him to make as well as placement. It also helped me to visualize the setup in 3D to ensure that I loved the whole look and every aspect of the design together. It was really neat doing for myself what I do for clients every day. I can’t believe that it took me almost a year to do a home design project for myself 😱 But the process was easy, fun and I absolutely loved putting myself in my clients shoes to experience the entire E-Design process first hand!
Alright, here come the juicy details! I KNEW I wanted a cozy and fun reading corner and what better than the Serena & Lily hanging chair that I had been eyeing for YEARS. With the position of the window in the room, we had the perfect little corner for this chair (if it was any bigger it wouldn’t have fit, but for our corner it fit perfectly!) We detailed exact hanging instructions HERE ❤️ You can use these instructions to hang any large swing/chair…we installed our porch swing the exact same way a few years ago. The pillows are from one of my favorite ETSY stores, Laurel & Blush Co. and the fun colors/textures really complete the swing.

Dark accent walls have been speaking to me lately. They are moody and can transform a space SO quickly. I knew that the back wall in this space was just screaming “PAINT ME DARK GREEN”. I perused a few colors and settled on Sherwin Willams Olympic Range. I wanted a true green (without too much black) that will still dark and moody enough. I LOVE this color and have never looked back 🎉 I decided to replace the ceiling fixture with one that was more modern and fun for the kids. I wanted to create a subtle statement on the ceiling against the green and white paint.
Ever since purchasing a Ruggable in our family room, I have fallen in love with the ease of cleaning, comfort and overall durability of these rugs. Ruggable does wonders for my Type A mind so I knew that this was the ONLY choice for the rug in this school room space. Black and whites have always been a favorite of mine and I just love how these tones pair wonderfully with the dark green. I debated a few of the different rug patterns but finally settled on this one! The lines in the rug make the space feel larger and the print is so fun for the kids! Today they had so much fun gluing and coloring on the rug today without a care in the world (same for me!!)

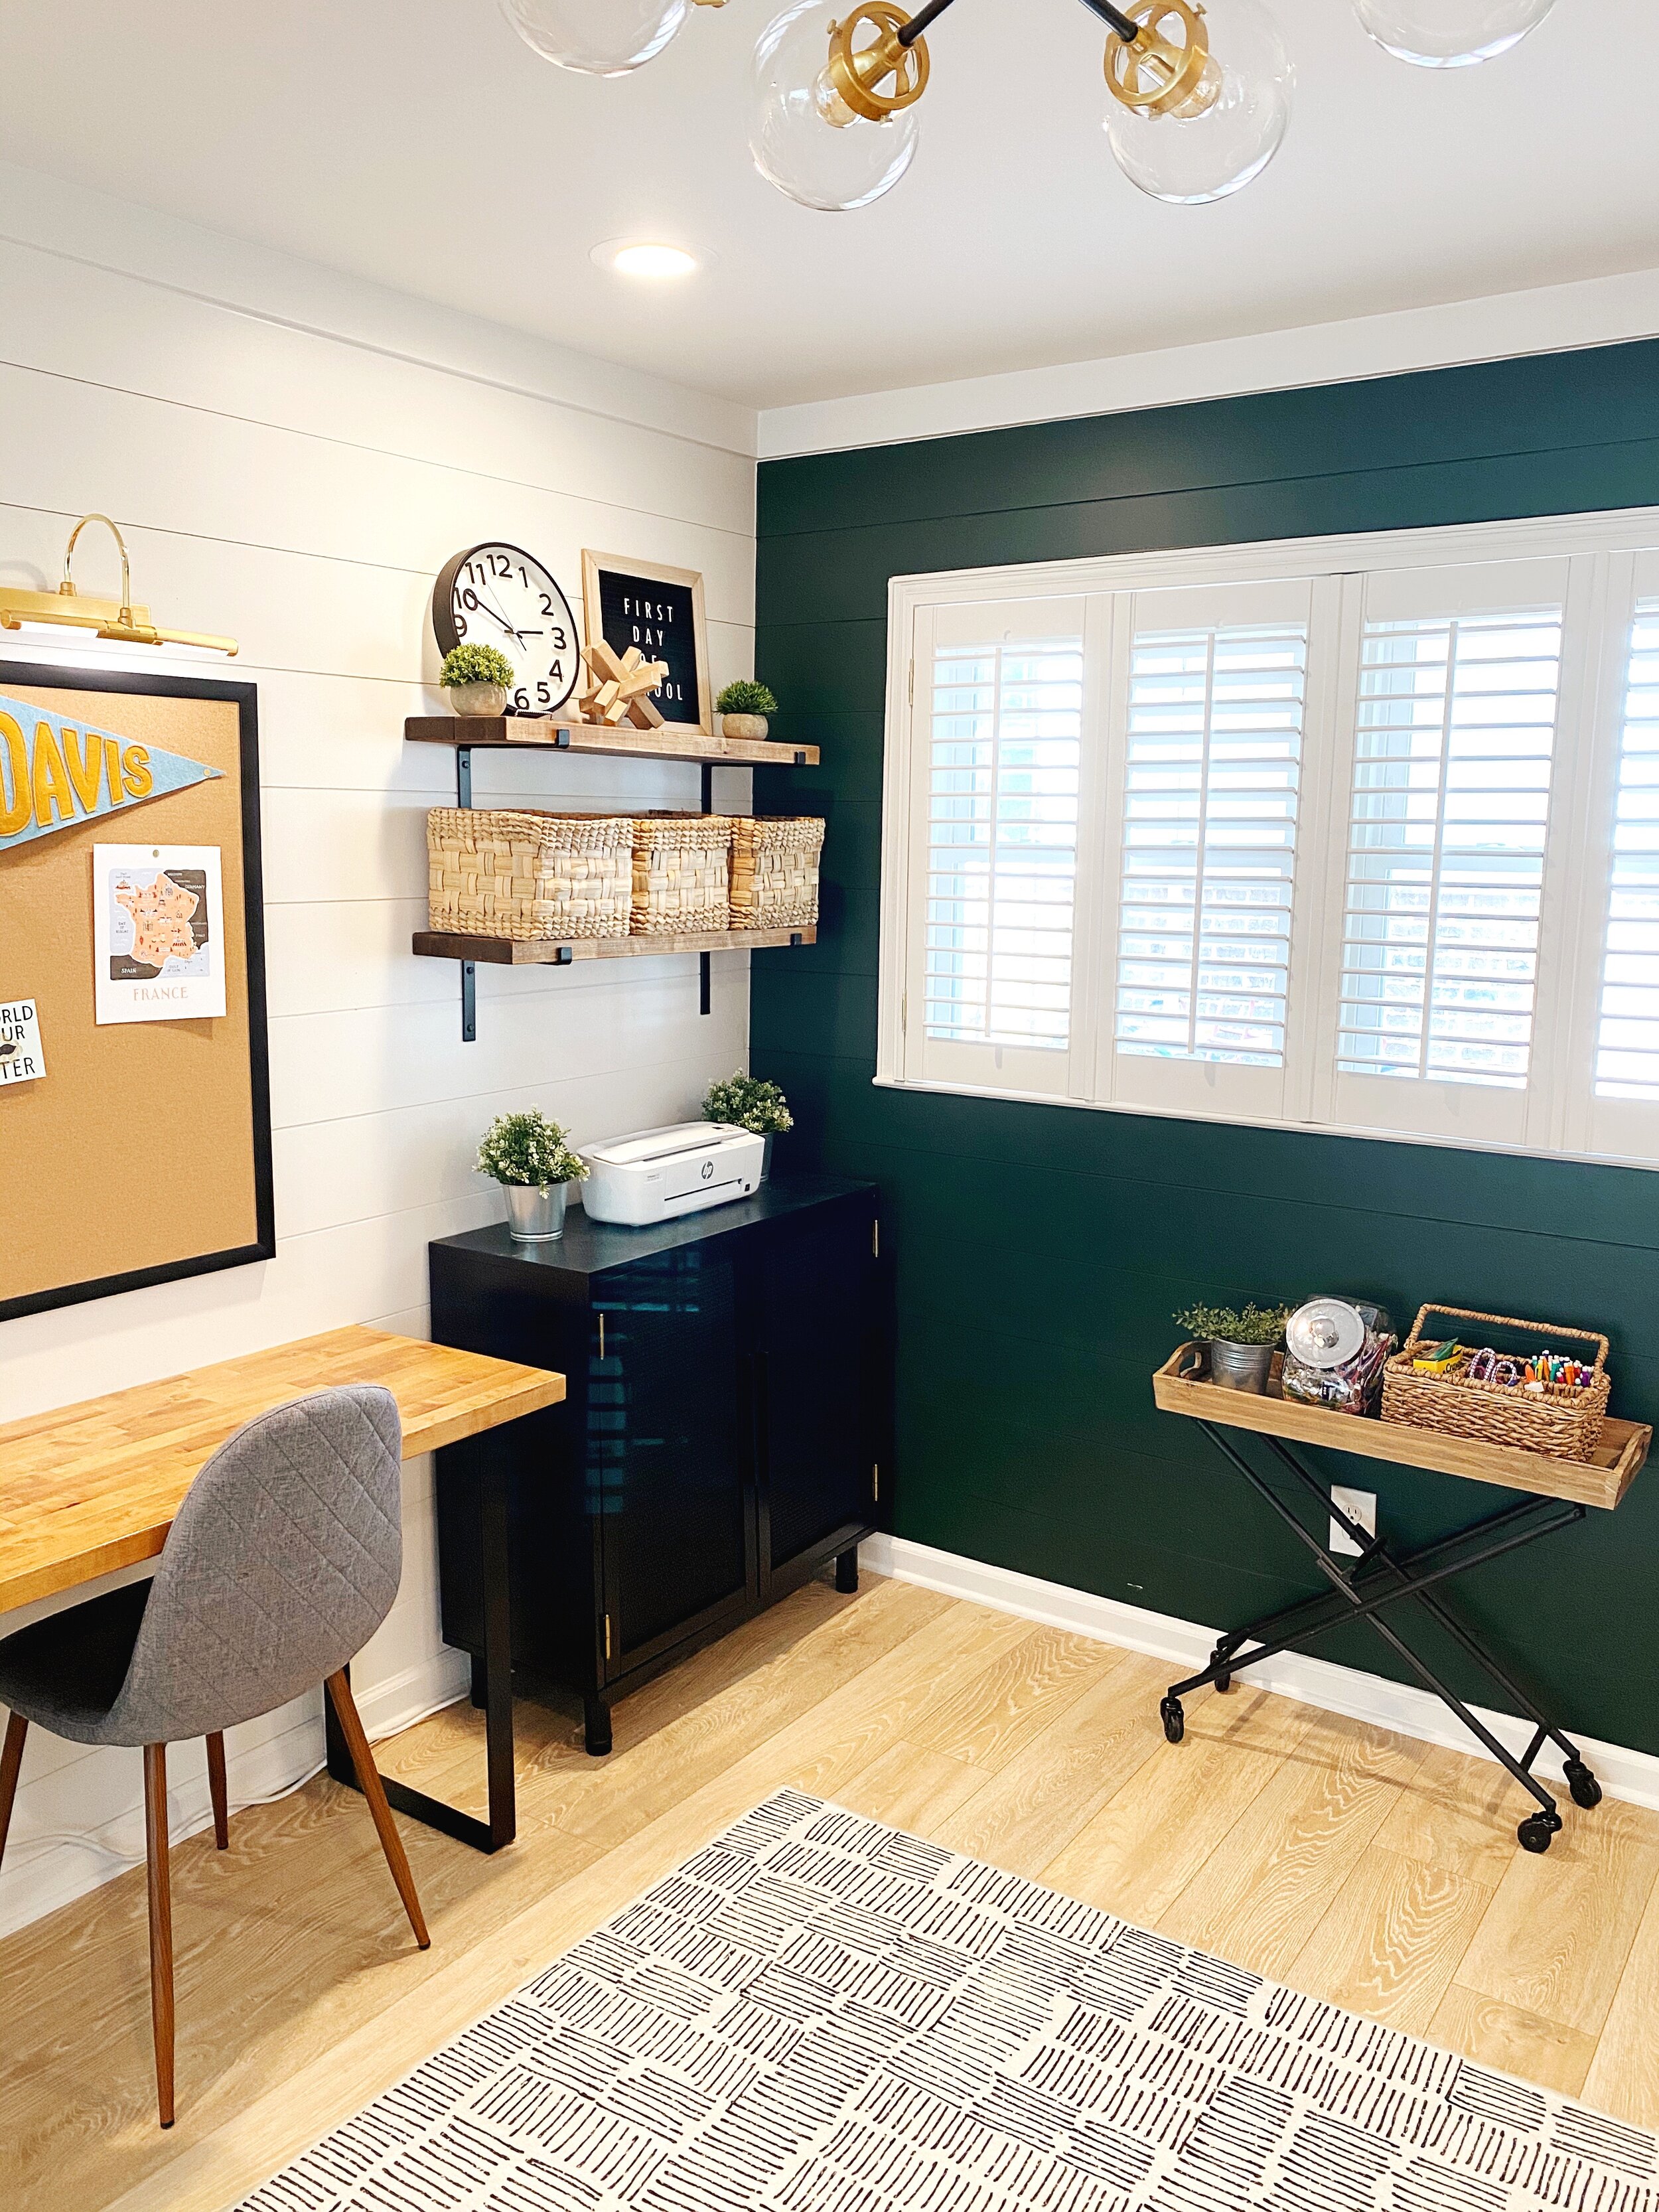
Alright let’s talk desks- with five kids and their teacher being in this space, I knew we needed lots of work/desk space. My first thought was that we needed long floating desks on each side…BUT my husband quickly vetoed the floating idea because he didn't want to mess up all of the shiplap. So we found an AMAZING metal company (Cascade Iron Co.) on ETSY that was so friendly and willing to work with us to get us exactly what we needed to support the desks. They used their standard bench legs but created them to the height and width we needed and drilled extra holes on the top for added support. We ordered the shelf brackets from them as well. I could recommend this company more! ❤️
My husband was put in charge of creating the actual desks. He chose this birch butcher block from Home Depot. He trimmed the wood to be 19” wide and we left the length at the pre-cut 8ft. I dawned my COVID mask and work gloves to help him cut down the width of the butcher block with his table saw. He then sanded the blocks, pre-sealed with Varathane pre-stain conditioner and stained the butcher block with Varathane Special Walnut (he did one coat of stain and then four coats of polyurethane satin sealant finish on both the shelves and desks). I LOVE how they came out- they’re really the perfect size for the space!
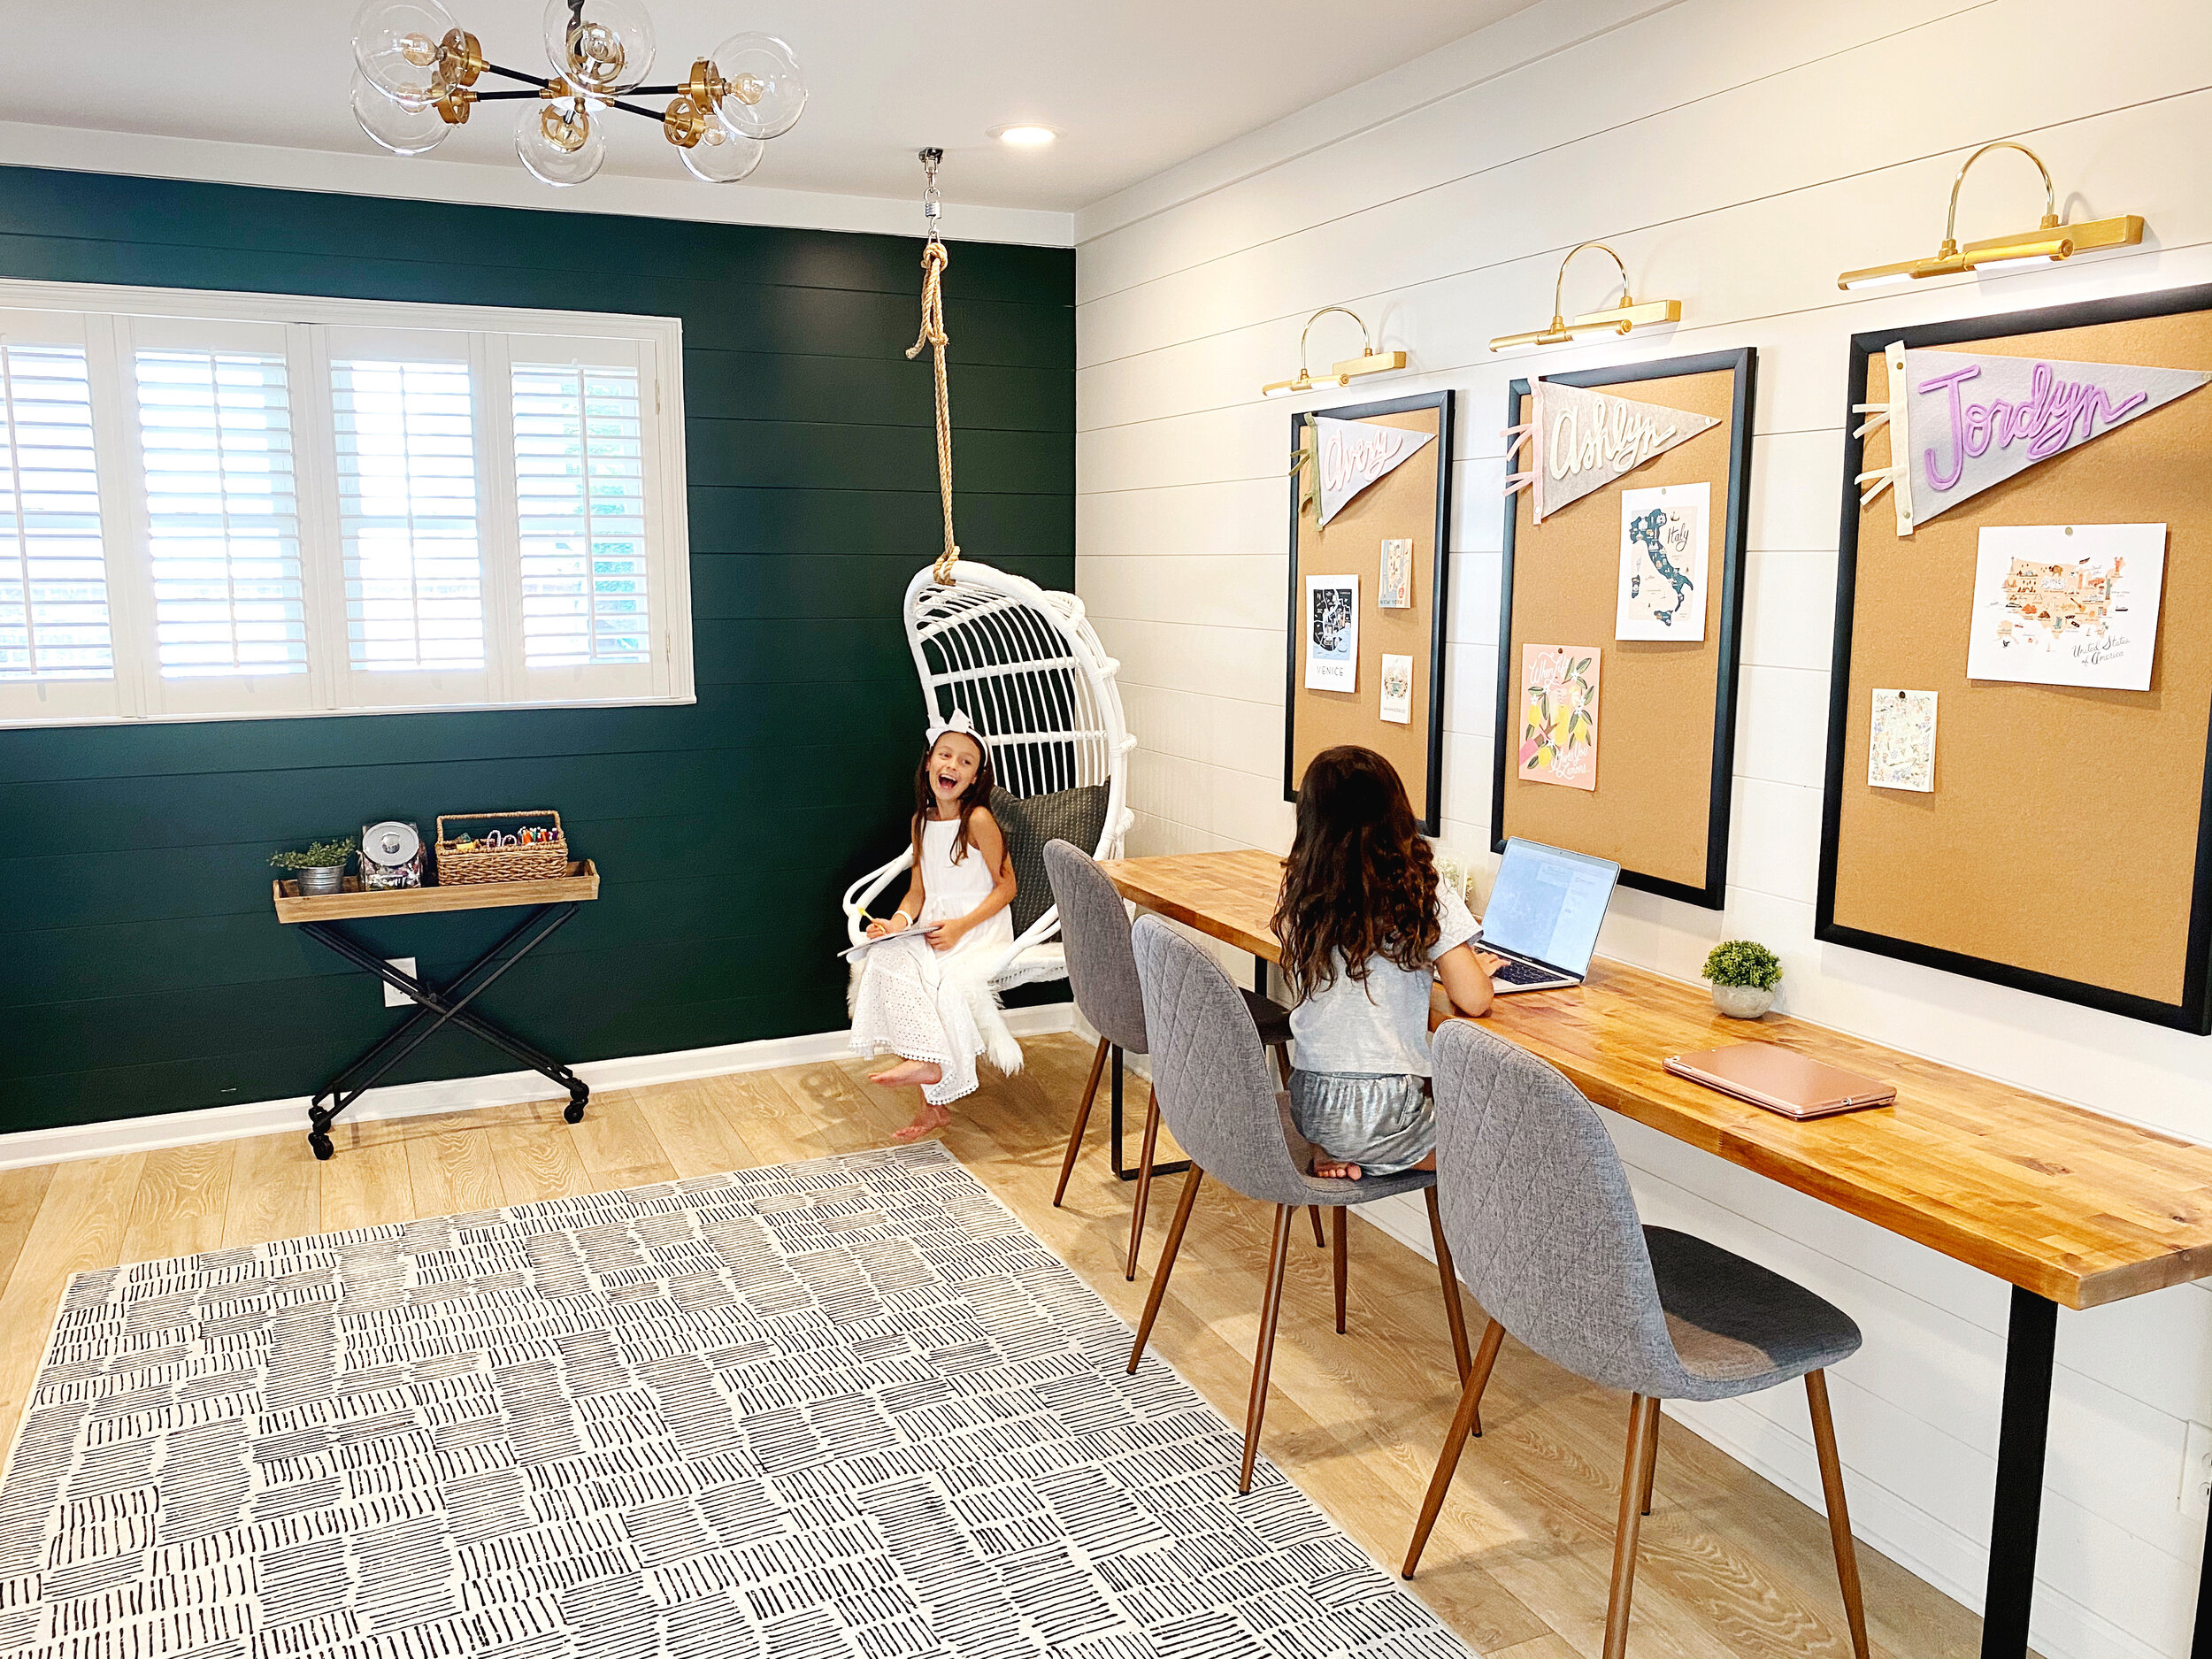
I bought these 23’x35” black framed bulletin boards off Amazing, I mean Amazon 😂 and ALL the cute Rifle Paper Co. artwork to pin on the bulletin boards to add pops of color. I ultimately went with battery powered picture lights to hang above the bulletin boards because I didn’t want to see 6 cords hanging down and hard wiring was NOT an option with the shiplap already in place. The picture lights were under $30 each and I really am so happy with them! They are remote controlled which my daughter loves to do “magic” with. The chairs were a STEAL as well from Amazon. Because we needed 6, I didn’t want to break the bank and I am so happy with these affordable chairs that I went with for the room. They are so comfy and I love the subtle quilted detailing on the back.
I really wanted each space to feel special for each of the kids in her virtual pod, so I ordered these incredibly adorable custom name pennants from Eventide Pennant. Co on ETSY. They REALLY complete the space and make it feel so colorful, fun and personal! I couldn’t recommend this shop and her adorable pennants more ❤️


We used the extra butcher block to cut the shelves (32” long by 9.25” wide) and I found a black storage cabinet to house all things school & art supplies (the exact one I purchased is sold out but this one is very similar and gorgeous)! A clock (so the kiddos can learn to tell time) was a must have for me in this space and I just love the baskets that I got to top the shelves. They provide so much storage and loads of subtle warm texture and dimension.


Our virtual learning pod had their first day in our classroom today and it was very much a success- mostly thanks to our amazing teacher overseeing the kids but I’d like to think they enjoyed the space as well :) We had so much fun creating the room and even if we go back to school face to face, I know my girls will enjoy this room for years to come!
You can easily shop everything in our virtual home school classroom below:


Here is the design board and the room after it was brought to life. E-Design is so much fun and such a great and affordable way to get a professionally designed space! Visit our website for more information and to secure your package today 🎉
Be sure to “Follow Us” to stay up to date on everything Porche and Co. & The Porche Place!
**This Post Contains Affiliate Links**

Do you love what we did with this space? Do some rooms or spaces in your house need some designer help but you aren't sure how to get started?
Check out our various Packages through the link below & let's get started designing your dream room(s) today!
Follow these 3 easy steps to get started today:
1. Select the E-Design package from that best works for your design needs
2. Complete the short Client Design Questionnaire on each space
3. Sit back and watch your dream home come to life!
You will have direct access to Emily through messenger throughout the whole process.
Multiple revisions are included with each package to ensure you are completely happy with the end result!

